📌 H1: Authentication and JWT એટલે શું? Backend Security માટે સંપૂર્ણ માર્ગદર્શિકા
Backend development માં Authentication and JWT એ બે સૌથી અગત્યના security pillars છે. તમે Node.js, Express.js અથવા કોઈપણ modern backend technology ઉપયોગ કરતાં હોવ, તો આ concepts સમજવા ખુબ જ જરૂરી છે.
આ blog માં આપણે step-by-step સમજશું કે Authentication and JWT શું છે અને backend security માં કેવી રીતે ઉપયોગ થાય છે.
🔐 H2: Authentication એટલે શું?
Authentication નો અર્થ થાય છે — “User કોણ છે?” એ verify કરવી.
✔️ Example Workflow:
- User login page પર email અને password નાખે છે.
- Server check કરે છે કે credentials match થાય છે કે નહીં.
- જો match થાય તો login allow થાય છે.
POST /login
{
  "email": "jay@example.com",
  "password": "123456"
}
✅ Match થાય તો: Login Success
❌ Match ન થાય: “Invalid credentials” error
🧾 H2: JWT (JSON Web Token) શું છે?
JWT એ એક digital token છે જે login થયા પછી server દ્વારા generate થાય છે અને client-side (browser/app) પર store થાય છે.
JWT ની રચના:
JWT 3 ભાગમાં વહેંચાયેલ હોય છે:
xxxxx.yyyyy.zzzzz| ભાગ | વિગત |
|---|---|
| Header | Token type અને algorithm |
| Payload | User ID, email, role વગેરે data |
| Signature | Hash value જે tampering detect કરે છે |
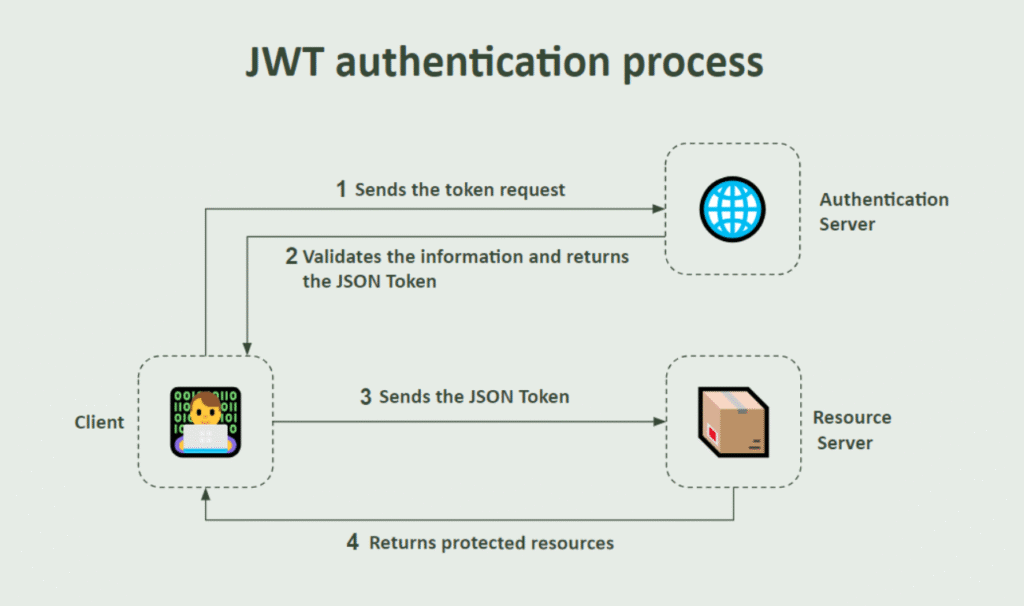
🔄 H2: JWT Workflow Explained Step-by-Step
🔹 Step 1: Login Request
User login માટે credentials મોકલે છે:
POST /login
{
  "email": "jay@example.com",
  "password": "123456"
}
🔹 Step 2: Server-side Validation
const jwt = require('jsonwebtoken');
const token = jwt.sign({ userId: user._id }, "secret_key", { expiresIn: '1h' });
🔹 Step 3: Token Client-side પર મોકલો
Server JWT client ને મોકલે છે. Client તેને localStorage કે cookie માં store કરે છે.
🔹 Step 4: Protected Route Access
User જ્યારે /profile જેવી route access કરે છે ત્યારે token header માં મોકલે છે:
Authorization: Bearer eyJhbGciOi...🔹 Step 5: Server Verify Token
const decoded = jwt.verify(token, "secret_key");
req.user = decoded.userId;
જો token valid હોય તો access allow થાય છે, નહિતર "Unauthorized" return થાય છે.
🧰 H2: Node.js JWT Integration માં ઉપયોગ થતી Packages
| ઉદ્દેશ | NPM Package |
|---|---|
| Token Generate કરવા માટે | jsonwebtoken |
| Password Hash માટે | bcryptjs |
| Protected Routes માટે | Custom Middleware |
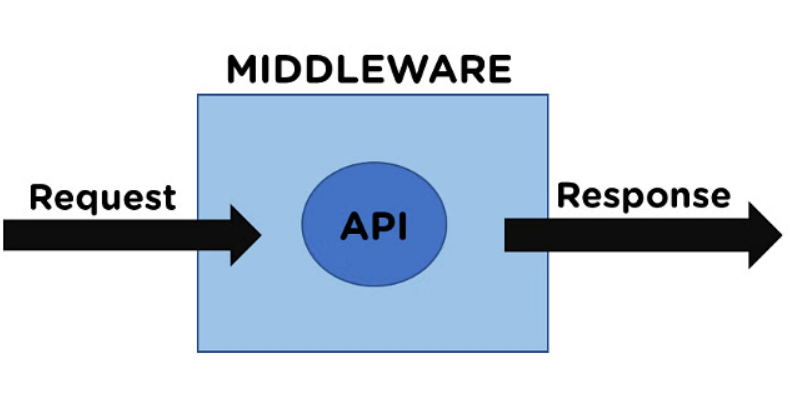
🛡️ H2: Auth Middleware Example (JWT Verify Middleware)
const jwt = require('jsonwebtoken');

function authMiddleware(req, res, next) {
  const token = req.header('Authorization')?.replace('Bearer ', '');
  if (!token) return res.status(401).send('Access denied');

  try {
    const verified = jwt.verify(token, 'secret_key');
    req.user = verified;
    next();
  } catch (err) {
    res.status(400).send('Invalid token');
  }
}
Protected route માટે આ રીતે middleware ઉમેરો:
app.get('/profile', authMiddleware, (req, res) => {
  res.send("Welcome " + req.user);
});
📌 H2: Summary Table – JWT અને Authentication નું સારાંશ
| Topic | Explanation |
|---|---|
| Authentication | User verify કરવો |
| JWT | Login પછી server દ્વારા generate કરાયેલ token |
| Token Store | Client-side (localStorage/cookie) |
| Middleware | JWT Verify કરી ને access allow |
📢 H3: શા માટે JWT Security માટે મહત્વપૂર્ણ છે?
- Stateless authentication (server-side session જરૂર નથી)
- Scalability માટે perfect solution
- Easy integration with frontend frameworks like React, Vue, Angular
✨ Conclusion
Authentication અને JWT આજે web security માટે standards બની ચૂક્યા છે. જો તમે backend developer છો, તો આ concepts ને સમજવું અને implement કરવું ફરજિયાત છે. Node.js અને Express.js સાથે JWT નો ઉપયોગ કરી તમે secure API બનાવી શકો છો જે real-world production માટે સારા security standards આપે છે.

2 Comments